 |
|
| HTML Code
You must have a moderate understanding of HTML in order to fully exploit the features of Authorize.Net WebLink. Although it is true that the following snippets of HTML code can be copied and pasted directly into a web site and it would "work", it is not likely that all of the specific needs you have with your web site will be met simply by copying and pasting this code. Merchants that are unable to achieve the custom look and feel they want on their own should consult with a local Internet web designer/programmer for assistance. Linking a web site to the Authorize.Net WebLink secure payment form Example
One - Bare minimum requirements
Linking a web site directly to the Authorize.Net
Secure transaction gateway
Example One - Bare minimum requirements The following HTML code snippet represents the bare minimum requirements: <form method="POST" action="https://www.authorize.net/scripts/authnet25/WebLink.asp"> <input type="hidden" name="LOGIN" value="your login id here"> <input type="hidden" name="AMOUNT" value="total amount here"> <input type="hidden" name="CUSTID" value="customer id here"> <input type="submit" value="Click Here for Secure Payment Form"> </form>
The result of the above HTML code
snippet on a web site is a simple button that is programmed to pass a total
dollar amount to the Authorize.Net secure payment form. Obviously this
represents the bare minimum, with no description, Customer ID, or Invoice
- fields that are likely to be desired. Once the customer arrives on the
Authorize.Net payment form, they will be prompted for payment information,
name, address, city, state, zip, country, phone, fax, and E-mail.
Example Two - Suggested minimum requirements The following HTML code snippet represents the suggested minimum requirements: <form method="POST"action="https://www.authorize.net/scripts/authnet25/WebLink.asp"> <input type="hidden" name="LOGIN" value="your login here"> <input type="hidden" name="AMOUNT" value="total amount here"> <input type="hidden" name="INVOICE" value="your invoice number here"> <input type="hidden" name="DESCRIPTION" value="order description here"> <input type="hidden" name="CUSTID" value="customer id here"> <input type="submit" value="Click Here for Secure Payment Form"> </form>
The result of the above HTML code
snippet on a web site is a simple button that is programmed to pass a total
dollar amount, invoice number, description, and customer id to the Authorize.Net
secure payment form. Once the customer arrives on the Authorize.Net payment
form, they will be prompted for payment information, name, address, city,
state, zip, country, phone, fax, and E-mail.
Example Three - Using your own form and a custom USER1 field The following HTML code snippet demonstrates how to use your own form to gather some of the information as well as a custom field prior to linking the Authorize.Net. Remember that in order for your fields to be passed to Authorize.Net properly, THE FIELD NAMES MUST BE NAMED CORRECTLY. <form method="POST" action="https://www.authorize.net/scripts/authnet25/WebLink.asp"> <input type="hidden" name="LOGIN" value="your loginid here"> <input type="hidden" name="AMOUNT" value="total amount here"> <input type="hidden" name="INVOICE" value="your invoice number here"> <input type="hidden" name="DESCRIPTION" value="order description here"> <input type="hidden" name="CUSTID" value="customer id here"> Enter your Name: <input type="text" name="NAME" size="40" maxlength="40"> <p>Enter special info: <input type="text" name="USER1" size="40" maxlength="40"> <p><input type="submit" value="Click Here for Secure Payment Form"> </form>
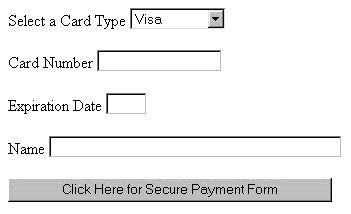
The result of the above HTML code snippet on a web site is two fields that prompt for Name (NAME) and special information (USER1) with a simple button that is programmed to pass a total dollar amount, invoice number, description, customer id, the name and special information to the Authorize.Net secure payment form. Once the customer arrives on the Authorize.Net payment form, they will be prompted for payment information, name, address, city, state, zip, country, phone, fax, and E-mail. Notice that even though you have passed the name to Authorize.Net, the Authorize.Net payment form will still prompt the user for it, only this time, it will be pre-filled in since your web site passed it to the payment form. It is possible to prevent the user from editing a field on the Authorize.Net payment form that your web site has already passed to it. Example One - Suggested minimum requirements Linking a web site directly to the Authorize.Net WebLink transaction gateway should only be done if your web site is secure and you have adequate programming skills to create your own payment form! The following HTML code snippet demonstrates the suggested minimum requirements: <form method="POST" action="https://www.authorize.net/scripts/authnet25/WLDoTrans.asp"> <input type="hidden" name="LOGIN" value="your loginid here"> <input type="hidden"name="AMOUNT" value="total amount here"> <input type="hidden"name="INVOICE" value="your invoice number here"> <input type="hidden" name="DESCRIPTION" value="order description here"> <input type="hidden" name="TYPE" value="NA"> <p>Select a Card Type <selectname="METHOD"> <option value="Visa">Visa <option value="MasterCard">MasterCard</select> <p>Card Number <input type="text" name="CARDNUM" size="16" maxlength="16"> <p>Expiration Date <input type="text" name="EXPDATE" size="4" maxlength="4"> <p>Name <input type="text" name="NAME" size="40" maxlength="40"> <input type="hidden" name="CUSTID" value="customer id here"> <p><input type="submit" value="Click Here for Secure Payment Form"> </form>
|